
On my way to achieving an MVP for my game, having a functional, decent and maintainable UI seemed extremely important. It was also quite adventurous as I know little about front-end development and design. I was still confident until I saw my old-school Unity UI and the mess that was the canvas object I had made a few years back. I am sure you are familiar with some of the horrors a large UI can turn into, well that was it.
My old UI had tons of issues. To name a few:
By far, the worst part was the radial menu used to select buildings. I created it in a sort of creativity-driven rage over a few days before forgetting my project for another 6 months. Yeah, that kind of feature 🙂...


Look at it! It's ugly. No one could possibly figure out why I chose 4 building slots to start with. Any changes would require redrawing all the assets, modifying the scripts or adding new copies of the whole menu. It is also a huge system that watches the mouse's position and scales and moves with camera zooms and movements. This was overkill nonsense, it had to go!
In Unity, the "standard" UI system scares me. The distinction between elements, styles and behaviors is not clear enough and it entirely relies on your implementation and quality of code. As such, I searched for a tool to make the task easier. Hopefully, I could find something with an editor window. That is when I came across UI Toolkit. It is a free package built in Unity which came out in 2020. There is a bit of controversy surrounding it because its development took much longer than initially estimated and because. Furthermore, as of today, it does not fulfill all its promises in terms of features. But I’m sure it will be good enough to build a sturdy UI. (hopefully I won’t regret writing this... )
Without further ado, let’s dive into it!
")
💡 UI Toolkit is built in Unity but if you want to change the version, it is available as a package called
com.unity.ui.
Start things off by creating a folder in your project hierarchy that will hold the elements UI Toolkit produces. UI Toolkit does not generate many files, which is appreciable. It uses a UXML representation for UI elements and stylesheets similar to CSS for the styles. With UI Toolkit, you have the clear separation between elements (UXML), style (stylesheets) and behaviors (c# scripting) I was looking for.
Then click on Create > UI Toolkit > UI Document Document. This is the aforementioned UXML document which will hold the body of your UI Element. After opening it, you should be met with the UI builder editor window. From here you can drag and drop various elements in your hierarchy on the left and modify their components on the right.

Now, to create our component, we have two things to do: drag and drop the right elements and tweak their settings. Easy right? Well not exactly... First, let’s focus on visual elements, these are the basic containers you will use to split your component. Think of them as HTML divs.

Use them to plan ahead the architecture of your component. In this situation, we want something similar to this: a component holding three identical rows which all contain two elements side by side.

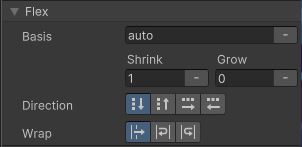
The main visual element (dark grey) holds three visual elements (the rows - in white) which all hold two visual elements (light grey). Now you need to play with the settings to achieve what you want. Adding a minimal size to visual elements usually helps to see what goes where. Otherwise, you will end up working with elements merely a pixel wide and it will be way harder. I will not address all the settings necessary but here are some useful ones.
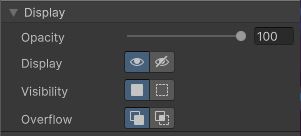
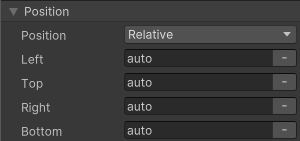
Tip : This kind of field accepts pixel values and percentages. Use the latter as much as possible to avoid unwanted behaviour when resizing.
In one of the last children, you will then need to add a "label" to hold some text. Simply drag and drop it from the “Controls” section. Name it wisely, we will need it later. For the image, you can put a sprite in the “Background” setting of the visual element.
Tip : UI Toolkit lacks a few features including image aspect ratio lock. To do this, you can set the size to 0 and set the top padding to 100% and both side paddings to 50%. This works because the padding property is relative to the parent’s size when specified in percentages.
In the end, you should have something similar to this.

This step is very simple. Simply add a game object to your scene with a “UI Document” component. You can put your newly created UXML document in the source asset. You will also need a panel setting. You can create it from Create > UI Toolkit > Panel Settings Asset and put it in the component. Your UI should now appear in the game view. But those values need to change during runtime… Let’s see how to do this!
Create or open a script and import the UI package: using UnityEngine.UIElements;. Add a new serialized UIDocument property. We will not work with this object directly but rather with the root of the document which can be accessed using document.rootVisualElement. From this, you need to query the various elements you wish to modify. This is done using the Q<T>(string name) method which takes in the name of the element (this is where your wisely named labels will come in handy).
1Label foodLabel = root.Q<Label>("FoodLabel");
2Label woodLabel = root.Q<Label>("WoodLabel");
3Label stoneLabel = root.Q<Label>("StoneLabel");
Once you have accessed your elements, all there is left to do is change their text value as you would with any Unity UI Text: text.text = content;.
Save, specify your UIDocument component in the inspector and you should see the values of your brand-new UI change! Congratulations!
Thank you for reading this article to the end. In the next one, I will detail how to create a more complex UI element with dynamic UI element instantiation. I hope to see you in the next post. 🦦